Week 1 Week 2 Week 3 Week 4 Week 5 Week 6 Week 7 Week 8 Week 9 Week 10 Week 11 Week 12 Week 13 Week 14
Introduction
January 25th, 2023
After a semester of planning my senior capstone project, I can now start the execution of my plastic pultrusion machine! I will have 15 weeks from today to build a machine that turns plastic bottles into 3D printer filament. From this recycled filament, I will also make a some kind of art piece or data visualization that will show the effectiveness of the pultrusion machine. For the first bit of the semester, I plan on following Ondřej Šraitr’s tutorial to build his pultrusion Petamentor2 (as shown below). I am choosing this tutorial as my main resource because it is the most open source and collaborative pultrusion project I have found, with a an extremely supportive Facebook group of 2.5k people most of which are working towards building and modifying the Petamentor machine. The tutorial includes .stl files to 3D print a good chunk of the custom parts required for the project.
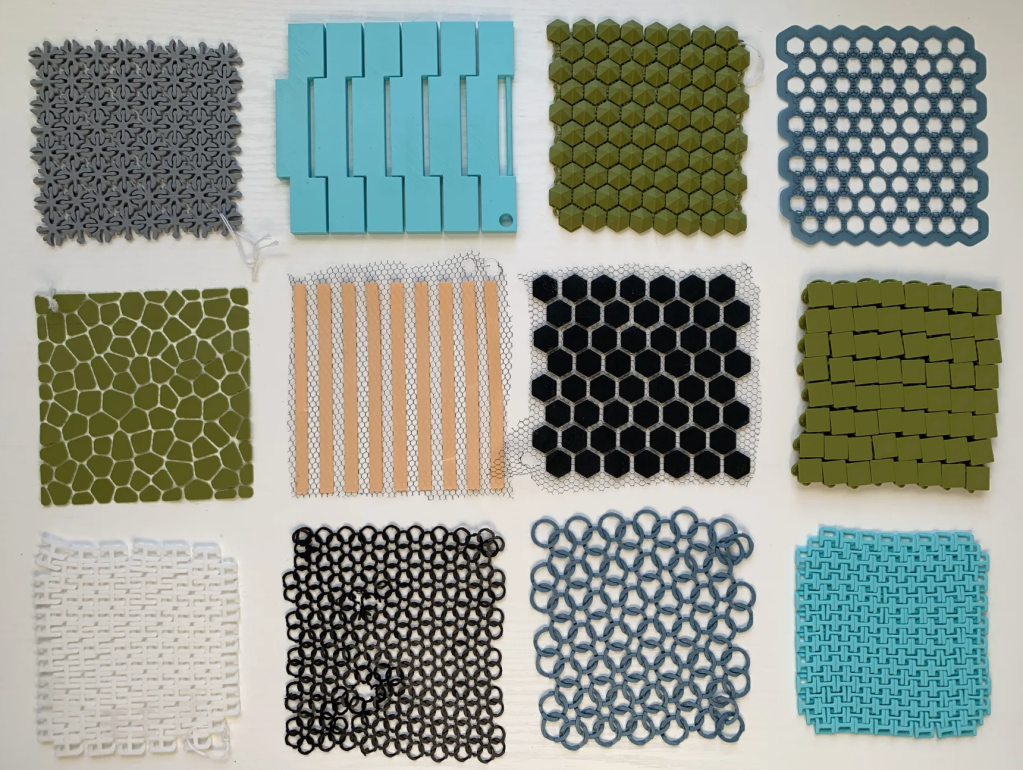
The Petamentor element of the project will take a considerable amount of time as I will need to order parts, learn how to build the machine, and optimize my yield of quality, printable filament for the final printed piece. Because of this, I’m allowing myself to keep the concept of my printed deliverable ambiguous until I get a bit further into this project. However, I hope to stay in the realm of modular, functional, large scale art similar to my PLAstic Textile Swatches that I made for my final project in my material studies class last semester.
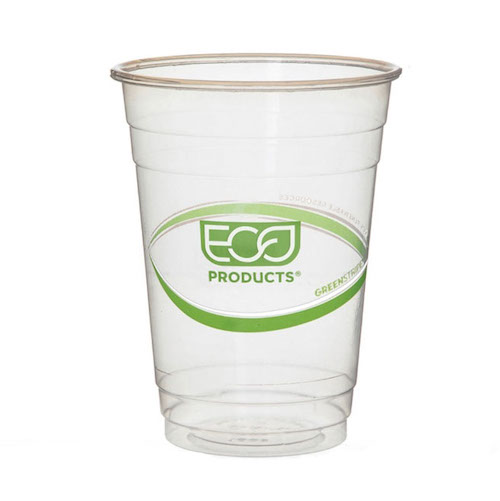
If I complete the machine and extrude plastic quicker than I expect, my goal is to try an make filament out of the injection molded PLA based cups used at Pekoe coffee shop in the Atlas building. Otherwise, I’ll most likely stick to PET based plastic bottles shown in the far left image below.


Here is a quick video that explains a bit about the chemistry, history, uses and sustainability of PLA.
Week 2
February 1st, 2023
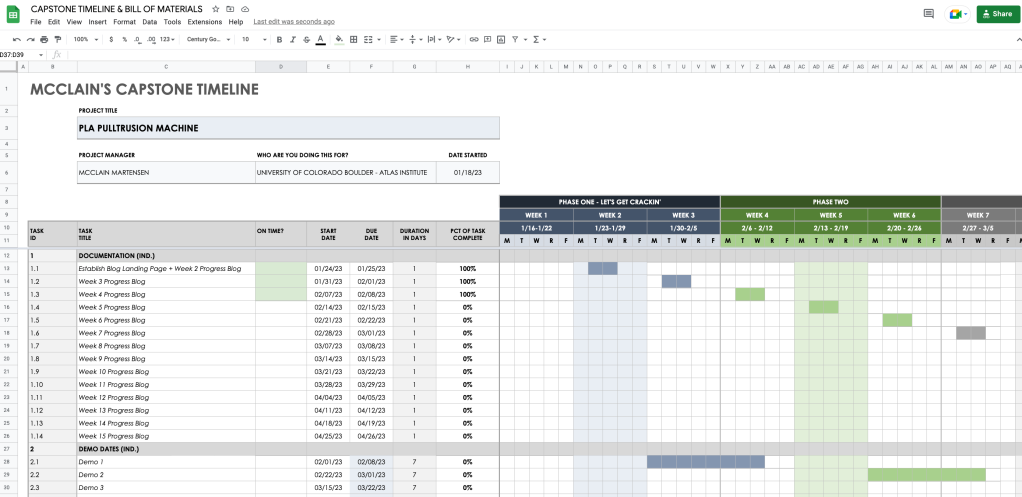
This week, I spent a lot of time organizing and planning out how I want to approach the semester. I started by reducing the scope of my project by removing the necessity for creating super complicated modular textiles with my filament. Instead, I now plan to spend a lot more time focusing on the construction, functionality, and approachability of the pultrusion machine. I created a gantt chart to further schedule out the semester, which made me feel a lot more confident about getting the ball rolling on building.
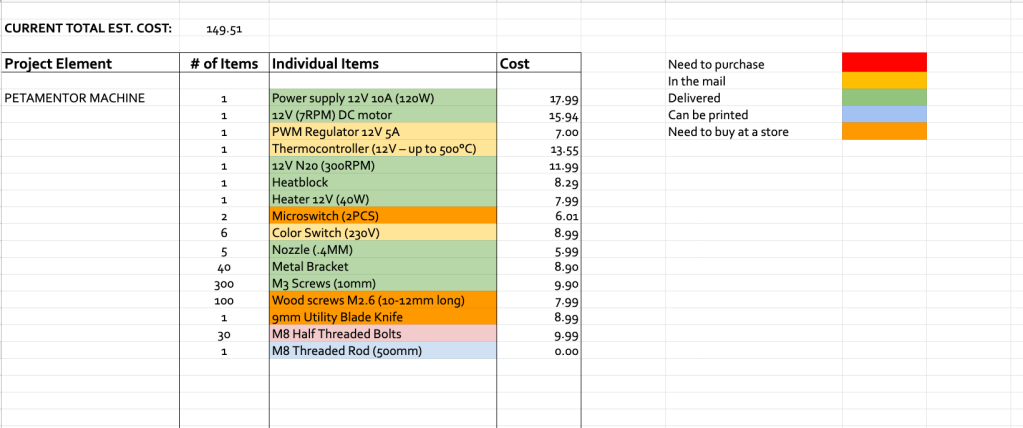
I also made sure to purchase a good chunk of the materials I need to build the entire Petamentor machine and made a comprehensive bill of materials so I can keep track of what I have, what’s being shipped, and how much I’ve spent (I plan to add this to my Mission Zero application. I plan to fill out this week so I can get money back for the $175 I’ve spent so far on materials).
During my weekly check-in meeting with John, he informed me that my schedule was organized in an isolated, waterfall fashion rather than an agile order where I could work on different things in parallel to each other. So, I made a point to move around my schedule so there was significant overlap between the development of my 3 main tasks for this project: Building Petamentor, Building PLA pultrusion Machine, and Printing with Filament. I created an executive google doc that will serve as my primary document for the semester, that contains a checklist schedule, notes, progress blogs (temp location) and flushed out deliverables for each task. This week, my action items are to watch and take very detailed notes on all the Petamentor tutorials, go to home depot and buy a couple items necessary to start building the machine, finish building my prusa, and get in contact with Michael Rivera to update him on the project.
Week 3
February 8th, 2023
This week, I am devoting a lot of time to start the process of building the Petamentor machine in lieu of the demo next wednesday. Last week, Ondřej released the concept of an integrated cutting device that allows the width of the stripped plastic to be adjusted while it’s being extruded by the motor. This attachment will be very useful as I can actively make adjustments with a single bottle, rather than needing to manually strip multiple bottles and individually extrude each strip until I figure out the optimal height for the stripped bottle I am working with. This should also give me more ability to work with different types of bottles as well. I’m super excited to be one of the first people to test out this new addition!

I managed to accomplish a ton of the goals I had last week, the most crucial being finishing building my Prusa MK3S+ so I can work on 3D printing parts for the machine. This took me FOREVER and I am so happy it is finally printing!!!


(this started in a million tiny pieces)

Building this unfortunately took a ton of time out of my schedule so I didn’t get as much time to research modding the PETamentor to work with PLA, but I did make some time to watch the beginning of his tutorial and take a ton of notes. I also signed up to participate in Mission Zero’s demo at the end of the year. I plan on doing my pitch presentation in 2-3 weeks from now.

I also booked a meeting with Michael to ask him a few questions and update him on where I’m at with the project. I’ll meet with him on February 13th.
Week 4
February 15th, 2023

This past week I spent a ton of time 3D printing parts for the petamentor machine. It took a while to figure out exactly what settings and parameters I needed to print really small gears and holes for screws (I learned a ton this week). One of the most important things I learned was the significance of slowing down print speed and adjusting temperature for better adhesion between the print bed and the first few layers of the print. I also learned a bit more about the differences between PLA, PETG and ABS particularly when printing smaller and detailed prints. So far I have printed parts for the integrated cutter, platform stands, spool holder, pullstrusion motor holder and on/off switch holder.


I also finally purchased all of the parts required for the machine. I am only waiting for 2 parts in the mail which are taking quite a while because they are coming from China. Luckily, I should have another 2-3 weeks before really needing them (crossing my fingers this will come in and I won’t have to reorder). I also scheduled my pitch presentation for mission zero to be on March 8th, so I need to put together a revised powerpoint from last semester’s presentation. For the demo, I finished my integrated cutter. Though this is quite behind where I originally intended to be with this, I am still really happy that I produced some kind of physical deliverable by week 4.

I also found a big white Ikea table behind Atlas. I thought this would be the perfect material for the machine’s platform as it is pretty thick, sturdy, painted, and most importantly FREE. I cut out two panels just in case I messed up the first one.

After this, I cut the piece of wood down with a table saw to be more precise.

I then added the 3D printed feet to the platform. At this point, I realized that I didn’t like the look of the exposed fiberboard on the edges. So I was told to use bondo to seal up the edges before painting it. (I have never worked with bondo, so I decided this will be a task for next week.

Week 5
February 22nd, 2023
Earlier this week, I attempted to apply bondo to the edges of the machine. After tedious application, I sanded down the bondo. I unfortunately made the mistake of only using an N95 mask to sand indoors, which led to me to get a massive sinus and respiratory infection… not fun. This rendered me useless for 5 straight days.


After this, I painted the edges with white acrylic, to give the board consistent, non-textured edges.


This week I also printed a lot more parts:


At this point, all of the necessary parts I needed to extrude plastic came in the mail or were purchased at the store.


Week 6
March 1st, 2023
WIRE TIME!!!
The first thing I did was get the power supply unit (PSU) to be powered on using a switch. The first issue I ran into was the fact that the PSU didn’t come with a power cord! 😡😡😡 Luckily, I found a power cord from Goodwill that did the trick. I made sure to do a lot of tests with the cord with a multimeter to make sure electricity could still flow through the wire.
Once I was confident the power cord was functional, I soldered it to the switch and then connected it to the PSU. I also made sure to heat shrink and insulate every part of the wires I was working with to ensure I decrease the chance of shocking myself while using the machine in the future.


Next, I soldered together was my switches that will eventually control the rising and lowering of my cutter blades. Being able to adjust these blades will save me a considerable amount of time as I can optimize the wall height of the stripped plastic while it’s also being extruded (immediate results).


After this, I was able to insert my switches into my 3D printed enclosure that will include buttons to raise and lower the blades, as well as a knob that will control the speed of the spool motor. We now have clickable buttons that make a very satisfying sound.
I also purchased the correct sized bolts that will attach to the gears in the orange motor box and peek out through the top of the platform. These bolts will the be screwed onto the blade holders and will rotate to control the height of where the blade is. In the video below I put two pieces of tape on the bolts so you can see they move at the same rate.
Next, I soldered my motor to my PWM speed controller. Rather than needing an arduino for this process, I wanted to be able to use a potentiometer to actively control my motor speed while extruding plastic. I assume there will be instances where I may need to adjust my speed mid extrusion, so I hope this decision works in my favor as I start making plastic.

After getting all of these wires connected, I screwed in my PSU, cutter, temp controller, wire management cables, motor, and bracket for my heat block (which will eventually hold my nozzle). It took me quite a while to determine where everything should go, but after a lot of precise measuring (mainly for the bottle holder, motor, and cutter to ensure the filament is pulled in a straight line) and looking at a lot of other similar machines out there, I felt good about where I placed things.


Because all of my cutter parts were printed, they had some trouble fitting nuts that fit the bolts that went through the platform. But after a bit of adjusting, the blade holders screwed onto the bolts decently. I hope to get some better fitting nuts or reprint my cutter for a better fit if I have time.


After this, I was ready for my second class demo! At this point I was really happy with my machine. Even though I’m still not at the point of heating things, everything else is functioning accordingly.

Week 7
March 8th, 2023
Right after my demo, I screwed in my heat block to the bracket. I was also advised to consider how the bracket (which would be heated to at least 220°F), would damage my platform. So I decided to cut off a piece of acrylic and cover it in electrical tape. Both the bracket and the acrylic needed to be drilled into a bit by a 5mm drill bit to fit both the nozzle and the screw that holds the heating mechanism to the platform.


The nozzle also needed to be drilled into with a .5mm drill bit to allow for a printable filament width. After that, I sanded the nozzle down to make sure there were no jagged metal edges that would dig into the newly melted plastic and effect its shape.

Once I did all of that, the heat block, acrylic and nozzle easily screwed into the platform. After that, I screwed my hotend wire into the heat block, which will eventually act as the heat source for the heating mechanism.


Next, I started wiring up my temperature controller. There was a helpful tutorial on the Petamentor site that showed me how to properly connect my the W3230 controller to my power supply unit. however, the video instructed to cut off my temp sensor probe (which gave me a ton of issues).
Once I wired everything together, the temp controller started giving me some weird issues. Whenever the temp sensor wires touched, they would output the letters HHH and turn on the controller and heat it to the set temperature. When they weren’t touching, the controller would output LLL. I assumed this was because my hands where allowing for electricity to flow from one wire to the other. Even though the HHH error turned on the controller, this would not be acceptable to use for the machine because I would have no sense of what the temperature of the nozzle actually is.


I spent the rest of this week troubleshooting this issue. It has been a very frustrating process with few leads. I have consulted quite a few students and faculty for some guidance, which I will continue to do next week.
Week 8
March 15th, 2023
This week has been a very frustrating one. Most of my time has been spent troubleshooting the thermocontroller. A few things I have done:
- Discussed and pursued multiple ideas to troubleshoot the issue with Zach Weaver. Some of these included soldering the sensor wires together into one solid core, connecting one wire to the inside of the heating wire and the other to the heat block, and clipping the sensors on with clips and electrical tape.
- Ordered another of the same controller that had a probe on the end, which still presented the same issues.
- Read multiple data sheets for w3230 temp controllers, because all of them had similar controls, layouts, and errors (they all looked like the same exact controller made by the same manufacturer) –> sheet 1, sheet 2, sheet 3
- Was a long shot, but I also Facebook messaged Ondřej Šraitr and the Petamentor community for some guidance since a lot of people in that group used the same controller for their machines. I unfortunately only got responses of people saying they had the same issue. (Ondřej unfortunately didn’t respond. The day after I sent that message he expressed on his page that he really busy at the moment, so I feel a little bad for reaching out. He was really nice last time we talked at the beginning of the semester so I hope he’s doing alright).


To no avail, I drained another week trying to get this to work. Luckily, today I finally ran into Mike Rivera and asked him if he had any ideas. Of course, he knew exactly what the issue was and gave me a new NTC 100k wire (a new temp sensor)… wish I had gone to him first. Lesson learned.
Once I attached this sensor to the inside of my heat block (he showed me a designated hole for it) and adhered it with Kapton tape, the controller started putting out live readings! 😭 😭 😭


It took me a while to calibrate the controller to the new sensor with a laser thermometer gun, but eventually I started to get readings that aligned with what the thermometer read. Wooo!!! This was a great note to enter the weekend on.
Week 9
March 15th, 2023
After finally being able to extrude plastic, I was so ecstatic. I was able to get the plastic through the nozzle after a bit of pulling with some pliers. I noted that it was much easier to pull a thin strip of plastic through the nozzle before heating it, rather than letting it melt immediately as it touched the heat block.


When I first started melting plastic while the plastic bottle was simultaneously being stripped, I noticed the bottle had some issues staying flush to the platform. To fix this, I cut a piece of nylon and drilled a hole through the middle so it can sit on the top of the bottle and be secured by the threaded rod.

I also unfortunately encountered some issues with tension once I was able to attach my spool to the motor. I fear that it is because this temperature controller only goes up to 120°C. The heat block was also being significantly affected by ambient temperature and lowering the nozzle temp well below the melting point of PET plastic.
A few things I plan on changing before my deadline in 2 weeks:
- Purchasing a new temperature controller
- Laser cutting an enclosure for the heat block and nozzle
- Adding a new bowden tube and power supply unit to my Ender 3
- Optimize filament quality until it is printable

Though it is crunch time and I am a bit stressed, I am confident I can get this project done by the deadline.
This week, I also made a proper video demo for my bottle prep process:
Week 10
April 5th, 2023
After a very sobering demo, where my machine failed completely, I was informed that it would be impossible to produce printable filament at 120°C. Therefore, I had to start looking for other temperature controllers.
At first, I assumed that I just needed to get a temperature controller that went way beyond 120°C. So, I quickly bought the thermocontroller below.

Unfortunately, I didn’t realize this was an AC powered heater that had an output of 120V, so I spent a long time hooking this up to my power supply to no avail. I also only had a 12V cartridge heater, so I was limited to very few temperature controllers that only went up to 150°C (which is still not sufficient heating for PET plastic). I needed a controller that could heat up to 260°C. This was very frustrating, as this whole process sucked up a week of my time.

that I just installed 😭😤😡
Week 11
April 12th, 2023
Desperate for a solution, I contacted Michael Rivera about potential solutions to fix the heating mechanism. He confirmed that it would not be possible to use the AC temperature controller that I had. He then suggested I build my own PID temperature controller and sent me the video below.

I was very appreciative of this comprehensive tutorial by Electronoobs that explains how to build a temperature controller.

PID CONTROLLER TUTORIAL LINK: http://electronoobs.com/eng_arduino_tut24.php
Hopeful that I could quickly put this circuit together in time, I purchased all of the parts necessary for this heater:


While waiting for the parts to come in, I decided to spend some time getting my two Ender 3 Pro 3D printers back up and running so they can print my recycled filament. Both of them were unfortunately out of commission. One of them had a short circuited power supply unit that needed to be replaced. So, I purchased a new mean-well power supply unit and new a fan. I also 3D printed a nice new enclosure that could hold the PSU (and was noise cancelling).


Mean Well LRS-350-24 ultra silent PSU mod link: https://www.thingiverse.com/thing:2967389
Both of the printers also needed their bowden tubes changed from the standard white PTFE tubing to Capricorn premium PTFE bowden tubes that are way more rigid and heat resistant.


I also gave the printers a lot of love and cleaned up their extruders, as both printers had a ton of clogged plastic in the heat block and nozzle.


Below, are some tutorials that helped me out a ton with these repairs and mods. Thanks to all of the creators out there who make such helpful videos!
After a ton of work, both of these printers are now up, running, and ready to handle some recycled filament!


Week 12
April 19th, 2023

First, I starting building a more simple circuit with my arduino, LCD screen, MAX6675 module and K-type thermocouple that would simply read and display temperature:


After this, I added my transistors and rotary encoder that would allow me to set my PID constants and desired temperatures with the LCD screen. I used this schematic as a reference:

This was genuinely one of the most complicated circuits I’ve ever had to assemble. I was especially confused with how to integrate the IRFZ44N MOSFET transistor and s8050 NPN transistor into the circuit.


I also struggled with establishing common ground, as I was unfamiliar with making circuits that draw power from two different sources (arduino and power supply unit in this case). Once I finally started supplying heat to the heater cartridge, the temperature would regulate itself for a minute or two then it would sky rocket until I unplugged the machine. This resulted in some pretty serious smoke coming out from the breadboard. I realized it was coming from this one red jumper wire that was taking ALL of the voltage and trying ground it.


I also encountered an issue with the end of my thermocouple. Originally, when I was working with my old temperature controller, I was able to screw in the end of the wire (where it senses temperature) into a tiny hole on the side of the heat block. However, this thermocouple end was massive and wouldn’t fit on any part of the heat block.


As a solution, I just bit the bullet and purchased a new thermocontroller:

After adding some additional connectors, I managed to install the new thermocouple on the heat block with little issue.


I also decided to drill into the heat block a little to remove more tension and allow the plastic to more easily flow into the hole of the heat block.

After hours and hours of work, I started testing how the plastic would extrude.

At this point I was excited that I finally produced an couple inches of useable filament. However, I knew that this PID temperature controller had some MASSIVE issues I needed to tackle (mainly the breadboard smoking).
I realized that I needed to try something new or start becoming okay with the fact that I would finish out the semester with an incomplete project. Feeling absolutely defeated I started researching ways to generate 260 degrees of heat for hours! (I was about to stick a soldering iron in this damn thing). Luckily, while scouring the Petamentor Facebook page, I stumbled up on a post where someone was having the exact same issues as I was. Ecstatic, I noticed Ondrej replied to their questions with a link to a page I had not yet discovered. It was a link to an older version of this machine that showed you could use a diode to surpass the temperature constraints of the standard w3230 temperature controller I’ve had FROM THE BEGINNING!
Week 13
April 26th, 2023
This week was a busy one! Once I figured out that I could use my old w3230 controller (or a more reliable, w1209 controller), I immediately ordered my parts and got working.


I also found this tutorial Ondrej’s MK1 Petamentor (WOW I WISH I SAW THIS EARLIER!!!):
While waiting for this, I also decided to run to the hardware store and redo my cutter, as my old one was producing really inconsistent widths of spiralized bottles. I ended up following this tutorial from Function3D:
After a few trips to the hardware store and following that tutorial, I had a functional cutter!


Once the heating parts came in, I followed the tutorial and assembled everything and luckily, we had heat pretty instantly!


Week 14 – FINAL WEEK
May 3rd, 2023

EXPO WEEK!
At this point, I needed to focus on documentation and closing the project out. And luckily after an extensive amount of temperature calibrations and trial and error testing, we have a working machine ladies and gentlemen!!! Though I didn’t have enough time to print, I still managed to make filament in time, which I am absolutely ecstatic about!


Week 1 Week 2 Week 3 Week 4 Week 5 Week 6 Week 7 Week 8 Week 9 Week 10 Week 11 Week 12 Week 13 Week 14
